
ROCm Command Line Interface
Clock and Temperature Management
This repository includes the AMD ROCm-SMI tool. This tool exposes functionality for clock and temperature management of the ROCm-enabled system.
For detailed and up to date usage information, use:
/opt/rocm/bin/rocm-smi -h
Or see below for information on:
Optional Arguments
Display Options
Topology
Pages Information
Hardware-related Information
Software-related/controlled Information
Set Options
Reset Options
Auto-response Options
Output Options
Installation
You may find rocm-smi at the following location after installing the rocm package:
/opt/rocm/bin/rocm-smi
Alternatively, you may clone this repository and run the tool directly.
Version
The SMI will report a “version” which is the version of the kernel installed:
AMD ROCm System Management Interface v$(uname)
For ROCk installations, this will be the AMDGPU module version (e.g. 5.0.71) For non-ROCk or monolithic ROCk installations, this will be the kernel version, which will be equivalent to the following bash command:
$(uname -a) | cut -d ' ' -f 3)
Usage
For detailed and up to date usage information, see:
/opt/rocm/bin/rocm-smi -h
For your convenience, the output from the -h flag is as follows:
AMD ROCm System Management Interface | ROCM-SMI version: 1.4.1 | Kernel version: 5.6.20
- usage: rocm-smi [-h] [-d DEVICE [DEVICE …]] [–alldevices] [–showhw] [-a] [-i] [-v] [–showdriverversion]
[–showfwinfo [BLOCK [BLOCK …]]] [–showmclkrange] [–showmemvendor] [–showsclkrange] [–showproductname] [–showserial] [–showuniqueid] [–showvoltagerange] [–showbus] [–showpagesinfo] [–showpendingpages] [–showretiredpages] [–showunreservablepages] [-f] [-P] [-t] [-u] [–showmemuse] [–showvoltage] [-b] [-c] [-g] [-l] [-M] [-m] [-o] [-p] [-S] [-s] [–showmeminfo TYPE [TYPE …]] [–showpids] [–showpidgpus [SHOWPIDGPUS [SHOWPIDGPUS …]]] [–showreplaycount] [–showrasinfo [SHOWRASINFO [SHOWRASINFO …]]] [–showvc] [–showxgmierr] [–showtopo] [–showtopoweight] [–showtopohops] [–showtopotype] [–showtoponuma] [-r] [–resetfans] [–resetprofile] [–resetpoweroverdrive] [–resetxgmierr] [–setsclk LEVEL [LEVEL …]] [–setmclk LEVEL [LEVEL …]] [–setpcie LEVEL [LEVEL …]] [–setslevel SCLKLEVEL SCLK SVOLT] [–setmlevel MCLKLEVEL MCLK MVOLT] [–setvc POINT SCLK SVOLT] [–setsrange MINMAX SCLK] [–setmrange MINMAX SCLK] [–setfan LEVEL] [–setperflevel LEVEL] [–setoverdrive %] [–setmemoverdrive %] [–setpoweroverdrive WATTS] [–setprofile SETPROFILE] [–rasenable BLOCK ERRTYPE] [–rasdisable BLOCK ERRTYPE] [–rasinject BLOCK] [–gpureset] [–load FILE | –save FILE] [–autorespond RESPONSE] [–loglevel LEVEL] [–json] [–csv]
Optional Arguments |
|
-h, –help |
show this help message and exit |
–gpureset |
Reset specified GPU (One GPU must be specified) |
–load FILE |
Load Clock, Fan, Performance and Profile settings from FILE |
–save FILE |
Save Clock, Fan, Performance and Profile settings to FILE |
-d DEVICE [DEVICE …], –device DEVICE [DEVICE …] Execute command on specified device
Display Options |
|
–alldevices |
|
–showhw |
Show Hardware details |
-a, –showallinfo |
Show Temperature, Fan and Clock values |
Topology |
|
-i, –showid |
Show GPU ID |
-v, –showvbios |
Show VBIOS version |
–showdriverversion |
Show kernel driver version |
–showfwinfo [BLOCK [BLOCK …]] |
Show FW information |
–showmclkrange |
Show mclk range |
–showmemvendor |
Show GPU memory vendor |
–showsclkrange |
Show sclk range |
–showproductname |
Show SKU/Vendor name |
–showserial |
Show GPU’s Serial Number |
–showuniqueid |
Show GPU’s Unique ID |
–showvoltagerange |
Show voltage range |
–showbus |
Show PCI bus number |
Pages Information |
|
–showpagesinfo |
Show retired, pending and unreservable pages |
–showpendingpages |
Show pending retired pages |
–showretiredpages |
Show retired pages |
–showunreservablepages |
Show unreservable pages |
Hardware-related Information |
|
-f, –showfan |
Show current fan speed |
-P, –showpower |
Show current Average Graphics Package Power Consumption |
-t, –showtemp |
Show current temperature |
-u, –showuse |
Show current GPU use |
–showmemuse |
Show current GPU memory used |
–showvoltage |
Show current GPU voltage |
Software-related/controlled information |
|
-b, –showbw |
Show estimated PCIe use |
-c, –showclocks |
Show current clock frequencies |
-g, –showgpuclocks |
Show current GPU clock frequencies |
-l, –showprofile |
Show Compute Profile attributes |
-M, –showmaxpower |
Show maximum graphics package power this GPU will consume |
-m, –showmemoverdrive |
Show current GPU Memory Clock OverDrive level |
-o, –showoverdrive |
Show current GPU Clock OverDrive level |
-p, –showperflevel |
Show current DPM Performance Level |
-S, –showclkvolt |
Show supported GPU and Memory Clocks and Voltages |
-s, –showclkfrq |
Show supported GPU and Memory Clock |
–showmeminfo TYPE [TYPE …] |
Show Memory usage information for given block(s) TYPE |
–showpids |
Show current running KFD PIDs |
–showpidgpus [SHOWPIDGPUS [SHOWPIDGPUS …]] |
Show GPUs used by specified KFD PIDs (all if no arg given) |
–showreplaycount |
Show PCIe Replay Count |
–showrasinfo [SHOWRASINFO [SHOWRASINFO …]] |
Show RAS enablement information and error counts for the specified block(s) (all if no arg given) |
–showvc |
Show voltage curve |
–showxgmierr |
Show XGMI error information since last read |
–showtopo |
Show hardware topology information |
–showtopoweight |
Shows the relative weight between GPUs |
–showtopohops |
Shows the number of hops between GPUs |
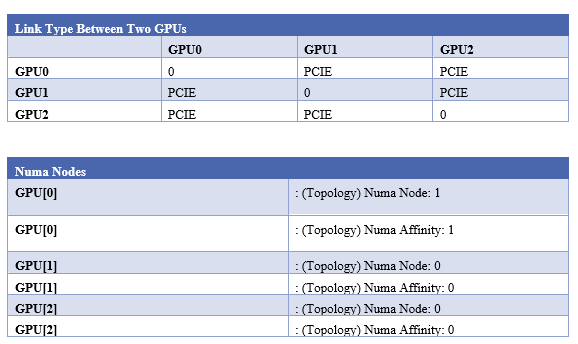
–showtopotype |
Shows the link type between GPUs |
–showtoponuma |
Shows the numa nodes |
Set Options |
|
–setsclk LEVEL [LEVEL …] |
Set GPU Clock Frequency Level(s) (requires manual Perf level) |
–setmclk LEVEL [LEVEL …] |
Set GPU Memory Clock Frequency Level(s) (requires manual Perf level) |
–setpcie LEVEL [LEVEL …] |
Set PCIE Clock Frequency Level(s) (requires manual Perf level) |
–setslevel SCLKLEVEL SCLK SVOLT |
Change GPU Clock frequency (MHz) and Voltage (mV) for a specific Level |
–setmlevel MCLKLEVEL MCLK MVOLT |
Change GPU Memory clock frequency (MHz) and Voltage for (mV) a specific Level |
–setvc POINT SCLK SVOLT |
Change SCLK Voltage Curve (MHz mV) for a specific point |
–setsrange MINMAX SCLK |
Set min(0) or max(1) SCLK speed |
–setmrange MINMAX SCLK |
Set min(0) or max(1) MCLK speed |
–setfan LEVEL |
Set GPU Fan Speed (Level or %) |
–setperflevel LEVEL |
Set Performance Level |
–setoverdrive % |
Set GPU OverDrive level (requires manual|high Perf level) |
–setmemoverdrive % |
Set GPU Memory Overclock OverDrive level (requires manual|high Perf level) |
–setpoweroverdrive WATTS |
Set the maximum GPU power using Power OverDrive in Watts |
–setprofile SETPROFILE |
Specify Power Profile level (#) or a quoted string of CUSTOM Profile attributes “# # # #…” (requires manual Perf level) |
–rasenable BLOCK ERRTYPE |
Enable RAS for specified block and error type |
–rasdisable BLOCK ERRTYPE |
Disable RAS for specified block and error type |
–rasinject BLOCK |
Inject RAS poison for specified block (ONLY WORKS ON UNSECURE BOARDS) |
Reset Options |
|
-r, –resetclocks |
Reset clocks and OverDrive to default |
–resetfans |
Reset fans to automatic (driver) control |
–resetprofile |
Reset Power Profile back to default |
–resetpoweroverdrive |
Set the maximum GPU power back to the device deafult state |
–resetxgmierr |
Reset XGMI error count |
Auto-response Options |
|
–autorespond RESPONSE |
Response to automatically provide for all prompts (NOT RECOMMENDED) |
Output Options |
|
–loglevel LEVEL |
How much output will be printed for what program is doing, one of debug/info/warning/error/critical |
–json |
Print output in JSON format |
–csv |
Print output in CSV format |
Detailed Option Descriptions
–setsclk/–setmclk # [# # …]: This allows you to set a mask for the levels. For example, if a GPU has 8 clock levels, you can set a mask to use levels 0, 5, 6 and 7 with –setsclk 0 5 6 7 . This will only use the base level, and the top 3 clock levels. This will allow you to keep the GPU at base level when there is no GPU load, and the top 3 levels when the GPU load increases.
–setfan LEVEL: This sets the fan speed to a value ranging from 0 to 255 (not from 0-100%). If the level ends with a %, the fan speed is calculated as pct*maxlevel/100 (maxlevel is usually 255, but is determined by the ASIC) .. NOTE:
While the hardware is usually capable of overriding this value when required, it is
recommended to not set the fan level lower than the default value for extended periods
of time
–setperflevel LEVEL: This lets you use the pre-defined Performance Level values, which can include: auto (Automatically change PowerPlay values based on GPU workload) low (Keep PowerPlay values low, regardless of workload) high (Keep PowerPlay values high, regardless of workload) manual (Only use values defined in sysfs values)
–setoverdrive/–setmemoverdrive #: DEPRECATED IN NEWER KERNEL VERSIONS (use –setslevel/–setmlevel instead) This sets the percentage above maximum for the max Performance Level. For example, –setoverdrive 20 will increase the top sclk level by 20%. If the maximum sclk level is 1000MHz, then –setoverdrive 20 will increase the maximum sclk to 1200MHz
–setpoweroverdrive/–resetpoweroverdrive #: This allows users to change the maximum power available to a GPU package. The input value is in Watts. This limit is enforced by the hardware, and some cards allow users to set it to a higher value than the default that ships with the GPU. This Power OverDrive mode allows the GPU to run at higher frequencies for longer periods of time, though this may mean the GPU uses more power than it is allowed to use per power supply specifications. Each GPU has a model-specific maximum Power OverDrive that is will take; attempting to set a higher limit than that will cause this command to fail.
–setprofile SETPROFILE: The Compute Profile accepts 1 or n parameters, either the Profile to select (see –showprofile for a list of preset Power Profiles) or a quoted string of values for the CUSTOM profile.
NOTE: These values can vary based on the ASIC, and may include: SCLK_PROFILE_ENABLE - Whether or not to apply the 3 following SCLK settings (0=disable,1=enable)
NOTE: This is a hidden field. If set to 0, the following 3 values are displayed as ‘-‘ SCLK_UP_HYST
Delay before sclk is increased (in milliseconds) SCLK_DOWN_HYST
Delay before sclk is decresed (in milliseconds) SCLK_ACTIVE_LEVEL
Workload required before sclk levels change (in %) MCLK_PROFILE_ENABLE
Whether or not to apply the 3 following MCLK settings (0=disable,1=enable)
NOTE: This is a hidden field. If set to 0, the following 3 values are displayed as ‘-‘ MCLK_UP_HYST
Delay before mclk is increased (in milliseconds) MCLK_DOWN_HYST
Delay before mclk is decresed (in milliseconds) MCLK_ACTIVE_LEVEL
Workload required before mclk levels change (in %)
BUSY_SET_POINT - Threshold for raw activity level before levels change FPS - Frames Per Second USE_RLC_BUSY - When set to 1, DPM is switched up as long as RLC busy message is received MIN_ACTIVE_LEVEL - Workload required before levels change (in %)
Note
When a compute queue is detected, these values will be automatically applied to the system Compute Power Profiles are only applied when the Performance Level is set to “auto”
The CUSTOM Power Profile is only applied when the Performance Level is set to “manual” so using this flag will automatically set the performance level to “manual”
It is not possible to modify the non-CUSTOM Profiles. These are hard-coded by the kernel
-P, –showpower: Show Average Graphics Package power consumption
“Graphics Package” refers to the GPU plus any HBM (High-Bandwidth memory) modules, if present
-M, –showmaxpower: Show the maximum Graphics Package power that the GPU will attempt to consume. This limit is enforced by the hardware.
–loglevel: This will allow the user to set a logging level for the SMI’s actions. Currently this is only implemented for sysfs writes, but can easily be expanded upon in the future to log other things from the SMI
–showmeminfo: This allows the user to see the amount of used and total memory for a given block (vram, vis_vram, gtt). It returns the number of bytes used and total number of bytes for each block ‘all’ can be passed as a field to return all blocks, otherwise a quoted-string is used for multiple values (e.g. “vram vis_vram”) vram refers to the Video RAM, or graphics memory, on the specified device vis_vram refers to Visible VRAM, which is the CPU-accessible video memory on the device gtt refers to the Graphics Translation Table
-b, –showbw: This shows an approximation of the number of bytes received and sent by the GPU over the last second through the PCIe bus. Note that this will not work for APUs since data for the GPU portion of the APU goes through the memory fabric and does not ‘enter/exit’ the chip via the PCIe interface, thus no accesses are generated, and the performance counters can’t count accesses that are not generated. NOTE: It is not possible to easily grab the size of every packet that is transmitted in real time, so the kernel estimates the bandwidth by taking the maximum payload size (mps), which is the max size that a PCIe packet can be. and multiplies it by the number of packets received and sent. This means that the SMI will report the maximum estimated bandwidth, the actual usage could (and likely will be) less
–showrasinfo: This shows the RAS information for a given block. This includes enablement of the block (currently GFX, SDMA and UMC are the only supported blocks) and the number of errors ue - Uncorrectable errors ce - Correctable errors
Clock Type Descriptions
DCEFCLK - DCE (Display) FCLK - Data fabric (VG20 and later) - Data flow from XGMI, Memory, PCIe SCLK - GFXCLK (Graphics core)
Note
SOCCLK split from SCLK as of Vega10. Pre-Vega10 they were both controlled by SCLK
MCLK - GPU Memory (VRAM) PCLK - PCIe bus
Note
This gives 2 speeds, PCIe Gen1 x1 and the highest available based on the hardware
SOCCLK - System clock (VG10 and later)- Data Fabric (DF), MM HUB, AT HUB, SYSTEM HUB, OSS, DFD Note - DF split from SOCCLK as of Vega20. Pre-Vega20 they were both controlled by SOCCLK
–gpureset: This flag will attempt to reset the GPU for a specified device. This will invoke the GPU reset through the kernel debugfs file amdgpu_gpu_recover. Note that GPU reset will not always work, depending on the manner in which the GPU is hung.
—showdriverversion: This flag will print out the AMDGPU module version for amdgpu-pro or ROCK kernels. For other kernels, it will simply print out the name of the kernel (uname)
–showserial: This flag will print out the serial number for the graphics card NOTE: This is currently only supported on Vega20 server cards that support it. Consumer cards and cards older than Vega20 will not support this feature.
–showproductname: This uses the pci.ids file to print out more information regarding the GPUs on the system. ‘update-pciids’ may need to be executed on the machine to get the latest PCI ID snapshot, as certain newer GPUs will not be present in the stock pci.ids file, and the file may even be absent on certain OS installation types
–showpagesinfo | –showretiredpages | –showpendingpages | –showunreservablepages: These flags display the different “bad pages” as reported by the kernel. The three types of pages are: Retired pages (reserved pages) - These pages are reserved and are unable to be used Pending pages - These pages are pending for reservation, and will be reserved/retired Unreservable pages - These pages are not reservable for some reason.
–showmemuse | –showuse | –showmeminfo –showuse and –showmemuse are used to indicate how busy the respective blocks are. For example, for –showuse (gpu_busy_percent sysfs file), the SMU samples every ms or so to see if any GPU block (RLC, MEC, PFP, CP) is busy. If so, that’s 1 (or high). If not, that’s 0 (low). If we have 5 high and 5 low samples, that means 50% utilization (50% GPU busy, or 50% GPU use). The windows and sampling vary from generation to generation, but that is how GPU and VRAM use is calculated in a generic sense. –showmeminfo (and VRAM% in concise output) will show the amount of VRAM used (visible, total, GTT), as well as the total available for those partitions. The percentage shown there indicates the amount of used memory in terms of current allocations OverDrive settings
Enabling OverDrive requires both a card that support OverDrive and a driver parameter that enables its use.
Because OverDrive features can damage your card, most workstation and server GPUs cannot use OverDrive.
Consumer GPUs that can use OverDrive must enable this feature by setting bit 14 in the amdgpu driver’s ppfeaturemask module parameter
For OverDrive functionality, the OverDrive bit (bit 14) must be enabled (by default, the OverDrive bit is disabled on the ROCK and upstream kernels). This can be done by setting amdgpu.ppfeaturemask accordingly in the kernel parameters, or by changing the default value inside amdgpu_drv.c (if building your own kernel).
As an example, if the ppfeaturemask is set to 0xffffbfff (11111111111111111011111111111111), then enabling the OverDrive bit would make it 0xffffffff (11111111111111111111111111111111). These are the flags that require OverDrive functionality to be enabled for the flag to work:
--showclkvolt
--showvoltagerange
--showvc
--showsclkrange
--showmclkrange
--setslevel
--setmlevel
--setoverdrive
--setpoweroverdrive
--resetpoweroverdrive
--setvc
--setsrange
--setmrange
Testing changes
After making changes to the SMI, run the test script to ensure that all functionality remains intact before uploading the patch. This can be done using:
./test-rocm-smi.sh /opt/rocm/bin/rocm-smi
The test can run all flags for the SMI, or specific flags can be tested with the -s option.
Any new functionality added to the SMI should have a corresponding test added to the test script.
SDMA Usage Per-process
The SDMA usage per-process is available using the following command,
$ rocm-smi -showpids
Hardware Topology
This feature provides a matrix representation of the GPUs present in a system by providing information of the manner in which the nodes are connected.
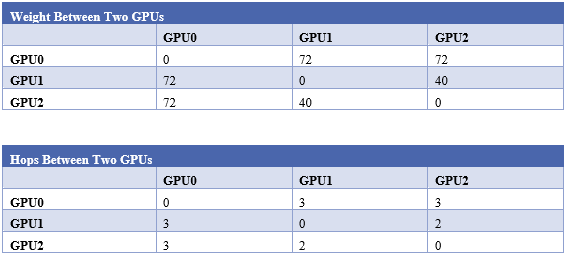
This is represented in terms of weights, hops, and link types between two given GPUs. It also provides the numa node and the CPU affinity associated with every GPU.
For more information about ROCm SMI API libraries, refer to the ROCm SMI API Guide at
https://github.com/RadeonOpenCompute/ROCm/blob/master/ROCm_SMI_API_Guide_v3.10.pdf