Deep Learning
MIOpen API
TensorFlow
AMD ROCm Tensorflow v1.15 Release
We are excited to announce the release of ROCm enabled TensorFlow v1.15 for AMD GPUs.
- In this release we have the following features enabled on top of upstream TF1.15 enhancements:
We integrated ROCm RCCL library for mGPU communication, details in RCCL github repo
XLA backend is enabled for AMD GPUs, the functionality is complete, performance optimization is in progress.
AMD ROCm Tensorflow v2.2.0-beta1 Release
In addition to Tensorflow v1.15 release, we also enabled Tensorflow v2.2.0-beta1 for AMD GPUs. The TF-ROCm 2.2.0-beta1 release supports Tensorflow V2 API. Both whl packages and docker containers are available below.
Tensorflow Installation
Install the open-source AMD ROCm 3.3 stack. For details, see here
2. Install other relevant ROCm packages.
sudo apt update
sudo apt install rocm-libs miopen-hip cxlactivitylogger rccl
3. Install TensorFlow itself (via the Python Package Index).
sudo apt install wget python3-pip
# Pip3 install the whl package from PyPI
pip3 install --user tensorflow-rocm #works only with python3.8 or prior
Tensorflow v2.2.0 is installed.
Tensorflow ROCm port: Basic installation on RHEL
The following instructions provide a starting point for using the TensorFlow ROCm port on RHEL.
Note It is recommended to start with a clean RHEL 8.2 system.
Install ROCm
Use the instructions below to add the ROCm repository.
export RPM_ROCM_REPO=https://repo.radeon.com/rocm/yum/3.7
Install the following packages.
# Enable extra repositories
yum --enablerepo=extras install -y epel-release

# Install required base build and packaging commands for ROCm
yum -y install \
    bc \
    cmake \
    cmake3 \
    dkms \
    dpkg \
    elfutils-libelf-devel \
    expect \
    file \
    gettext \
    gcc-c++ \
    git \
    libgcc \
    ncurses \
    ncurses-base \
    ncurses-libs \
    numactl-devel \
    numactl-libs \
    libunwind-devel \
    libunwind \
    llvm \
    llvm-libs \
    make \
    pciutils \
    pciutils-devel \
    pciutils-libs \
    python36 \
    python36-devel \
    pkgconfig \
    qemu-kvm \
    wget
Install ROCm packages.
# Add the ROCm package repo location
echo -e "[ROCm]\nname=ROCm\nbaseurl=$RPM_ROCM_REPO\nenabled=1\ngpgcheck=0" >> /etc/yum.repos.d/rocm.repo

# Install the ROCm rpms
sudo yum clean all
sudo yum install -y rocm-dev
sudo yum install -y hipblas hipcub hipsparse miopen-hip miopengemm rccl rocblas rocfft rocprim rocrand
Ensure the ROCm target list is set up.
bash -c 'echo -e "gfx803\ngfx900\ngfx906\ngfx908" >> $ROCM_PATH/bin/target.lst'
Install the required Python packages.
pip3.6 install --user \
    cget \
    pyyaml \
    pip \
    setuptools==39.1.0 \
    virtualenv \
    absl-py \
    six==1.10.0 \
    protobuf==3.6.1 \
    numpy==1.18.2 \
    scipy==1.4.1 \
    scikit-learn==0.19.1 \
    pandas==0.19.2 \
    gnureadline \
    bz2file \
    wheel==0.29.0 \
    portpicker \
    werkzeug \
    grpcio \
    astor \
    gast \
    termcolor \
    h5py==2.8.0 \
    keras_preprocessing==1.0.5
Install TensorFlow.
# Install ROCm manylinux WHL
wget <location of WHL file>
pip3.6 install --user ./tensorflow*linux_x86_64.whl
Tensorflow benchmarking
Clone the repository of bench test and run it
cd ~ && git clone https://github.com/tensorflow/benchmarks.git
python3 ~/benchmarks/scripts/tf_cnn_benchmarks/tf_cnn_benchmarks.py --model=resnet50
Tensorflow Installation with Docker
Note: firstly, configure docker environment for ROCm (information here)
Pull the docker images for Tensorflow releases with ROCm backend support. The size of these docker images is about 7 Gb.
sudo docker pull rocm/tensorflow:latest
Launch the downloaded docker image
alias drun='sudo docker run -it --network=host --device=/dev/kfd --device=/dev/dri --ipc=host --shm-size 16G --group-add video --cap-add=SYS_PTRACE --security-opt seccomp=unconfined -v $HOME/dockerx:/dockerx'

#Run it
drun rocm/tensorflow:latest
More information about tensorflow docker images can be found here
MIOpen
ROCm MIOpen v2.0.1 Release
Announcing our new Foundation for Deep Learning acceleration MIOpen 2.0 which introduces support for Convolution Neural Network (CNN) acceleration — built to run on top of the ROCm software stack!
This release includes the following:
This release contains bug fixes and performance improvements.
Additionally, the convolution algorithm Implicit GEMM is now enabled by default
- Known issues:
Backward propagation for batch normalization in fp16 mode may trigger NaN in some cases
Softmax Log mode may produce an incorrect result in back propagation
- Documentation
Changes:
Added Winograd multi-pass convolution kernel
Fixed issue with hip compiler paths
Fixed immediate mode behavior with auto-tuning environment variable
Fixed issue with system find-db in-memory cache, the fix enable the cache by default
Improved logging
Improved how symbols are hidden in the library
Updated default behavior to enable implicit GEMM
Porting from cuDNN to MIOpen
The porting guide highlights the key differences between the current cuDNN and MIOpen APIs.
The ROCm 3.3 has prebuilt packages for MIOpen
Install the ROCm MIOpen implementation (assuming you already have the ‘rocm’ and ‘rocm-opencl-dev” package installed):
MIOpen can be installed on Ubuntu using
apt-get
For just OpenCL development
sudo apt-get install miopengemm miopen-opencl
For HIP development
sudo apt-get install miopengemm miopen-hip
Or you can build from source code
Currently both the backends cannot be installed on the same system simultaneously. If a different backend other than what currently exists on the system is desired, please uninstall the existing backend completely and then install the new backend.
PyTorch
Building PyTorch for ROCm
This is a quick guide to setup PyTorch with ROCm support inside a docker container. Assumes a .deb based system. See ROCm install for supported operating systems and general information on the ROCm software stack.
Note: Currently, ROCm install version 3.3 is required.
Install or update rocm-dev on the host system:
sudo apt-get install rocm-dev
or
sudo apt-get update
sudo apt-get upgrade
Recommended: Install using published PyTorch ROCm docker image:
Obtain docker image:
docker pull rocm/pytorch:rocm4.0_ubuntu18.04_py3.6_pytorch
Start a docker container using the downloaded image:
sudo docker run -it -v $HOME:/data --privileged --rm --device=/dev/kfd --device=/dev/dri --group-add video rocm/pytorch:rocm3.7_ubuntu16.04_py3.6_pytorch
Confirm working installation:
PYTORCH_TEST_WITH_ROCM=1 python3.6 test/run_test.py --verbose
Note: Compilation and installation must be correct for the tests to be successful.
Install torchvision:
pip install torchvision
This step is optional but most PyTorch scripts will use torchvision to load models. E.g., running the pytorch examples requires torchvision.
Option 2: Install using PyTorch upstream docker file
Clone PyTorch repository on the host:
cd ~
git clone https://github.com/pytorch/pytorch.git
cd pytorch
git submodule init
git submodule update
Build PyTorch docker image:
 cd pytorch/docker/caffe2/jenkins
 ./build.sh py2-clang7-rocmdeb-ubuntu16.04

A message "Successfully built <image_id>" indicates a successful completion of this step.
Note: These steps are not tested and validated on other software versions.
Start a docker container using the new image:
sudo docker run -it -v $HOME:/data --privileged --rm --device=/dev/kfd --device=/dev/dri --group-add video <image_id>
Note: This will mount your host home directory on /data in the container.
Change to previous PyTorch checkout from within the running docker:
cd /data/pytorch
Build PyTorch for ROCm:
Unless you are running a gfx900/Vega10-type GPU (MI25, Vega56, Vega64,…), explicitly export the GPU architecture to build for, e.g.: export HCC_AMDGPU_TARGET=gfx906
then
.jenkins/pytorch/build.sh
This will hipify the PyTorch sources first, and then compile using 4 concurrent jobs. Note, the docker image requires 16 GB of RAM.
Confirm working installation:
PYTORCH_TEST_WITH_ROCM=1 python test/run_test.py --verbose
No tests will fail if the compilation and installation is correct.
Install torchvision:
pip install torchvision
This step is optional; however, most PyTorch scripts use torchvision to load models. For example, running the pytorch examples requires torchvision.
Commit the container to preserve the pytorch install (from the host):
sudo docker commit <container_id> -m 'pytorch installed'
Option 3: Install using minimal ROCm docker file
1. Download dockerfile based on the OS choose: Recommend to use - Dockerfile-<OS distro>-complete to get all the ROCm Math libs installed which are required for PyTorch.
Build docker image:
sudo docker build -f ./Dockerfile-<OS distro>-complete .
The message “Successfully built <image_id>” indicates a successful completion of this step.
Start a docker container using the new image:
sudo docker run -it -v $HOME:/data --privileged --rm --device=/dev/kfd --device=/dev/dri --group-add video <image_id>
Note: This will mount your host home directory on /data in the container.
Clone pytorch master (on to the host):
cd ~
git clone https://github.com/pytorch/pytorch.git or git clone https://github.com/ROCmSoftwarePlatform/pytorch.git
cd pytorch
git submodule init
git submodule update --init --recursive'
Run “hipify” to prepare source code (in the container):
python3 tools/amd_build/build_amd.py
Build and install pytorch:
By default pytorch is built for all supported AMD GPU targets like gfx900/gfx906/gfx908 (MI25, MI50, MI60, MI100, …) This can be overwritten using export PYTORCH_ROCM_ARCH=gfx900;gfx906;gfx908
then
USE_ROCM=1 MAX_JOBS=4 python3 setup.py install --user
UseMAX_JOBS=n to limit peak memory usage. If building fails try falling back to fewer jobs. 4 jobs assume available main memory of 16 GB or larger.
Confirm working installation:
PYTORCH_TEST_WITH_ROCM=1 python3 test/run_test.py --verbose
No tests will fail if the compilation and installation is correct.
Install torchvision:
pip3 install --user "git+https://github.com/pytorch/vision.git"
This step is optional. However, most PyTorch scripts will use torchvision to load models. For example, running the PyTorch examples requires torchvision.
Commit the container to preserve the pytorch install (from the host):
sudo docker commit <container_id> -m 'pyTorch installed'
PyTorch examples
Clone the PyTorch examples repository:
git clone https://github.com/pytorch/examples.git && cd examples/
Download pip requiremenst:
pip3 install -r mnist/requirements.txt
Run individual example: Super-resolution training and running
cd super_resolution/

# download dataset for training and run learning
python3 main.py --upscale_factor 3 --batchSize 4 --testBatchSize 100 --nEpochs 30 --lr 0.001

# test work super resolution effect
python3 super_resolve.py --input_image dataset/BSDS300/images/test/16077.jpg \
--model model_epoch_30.pth --output_filename out.png
Open out.png and dataset/BSDS300/images/test/16077.jpg files to see result
Building Caffe2 for ROCm
This is a quick guide to setup Caffe2 with ROCm support inside docker container and run on AMD GPUs. Caffe2 with ROCm support offers complete functionality on a single GPU achieving great performance on AMD GPUs using both native ROCm libraries and custom hip kernels. This requires your host system to have rocm-3.3s drivers installed. Please refer to ROCm install to install ROCm software stack. If your host system doesn’t have docker installed, please refer to docker install. It is recommended to add the user to the docker group to run docker as a non-root user, please refer here.
- This guide provides two options to run Caffe2.
Launch the docker container using a docker image with Caffe2 installed.
Build Caffe2 from source inside a Caffe2 ROCm docker image.
Option 1: Docker image with Caffe2 installed:
This option provides a docker image which has Caffe2 installed. Users can launch the docker container and train/run deep learning models directly. This docker image will run on both gfx900(Vega10-type GPU - MI25, Vega56, Vega64,…) and gfx906(Vega20-type GPU - MI50, MI60)
Launch the docker container
docker run -it --network=host --device=/dev/kfd --device=/dev/dri --group-add video rocm/pytorch:rocm3.7_ubuntu16.04_py3.6_caffe2
This will automatically download the image if it does not exist on the host. You can also pass -v argument to mount any data directories on to the container.
Option 2: Install using Caffe2 ROCm docker image:
1. Clone PyTorch repository on the host:
cd ~
git clone --recurse-submodules https://github.com/pytorch/pytorch.git
cd pytorch
git submodule update --init --recursive
Launch the docker container
docker pull rocm/pytorch:rocm3.7_ubuntu16.04_py3.6_caffe2
docker run -it --network=host --device=/dev/kfd --device=/dev/dri --group-add video -v $PWD:/pytorch rocm/pytorch:rocm3.7_ubuntu16.04_py3.6_caffe2
3. Build Caffe2 from source
cd /pytorch
If running on gfx900/vega10-type GPU(MI25, Vega56, Vega64,…)
.jenkins/caffe2/build.sh
If running on gfx906/vega20-type GPU(MI50, MI60)
HCC_AMDGPU_TARGET=gfx906 .jenkins/caffe2/build.sh
Test the Caffe2 Installation
To validate Caffe2 installation, run
1. Test Command
cd ~ && python -c 'from caffe2.python import core' 2>/dev/null && echo "Success" || echo "Failure"
2. Running unit tests in Caffe2
cd /pytorch
.jenkins/caffe2/test.sh
Run benchmarks
Caffe2 benchmarking script supports the following networks MLP, AlexNet, OverFeat, VGGA, Inception
To run benchmarks for networks MLP, AlexNet, OverFeat, VGGA, Inception run the command from pytorch home directory replacing <name_of_the_network> with one of the networks.
python caffe2/python/convnet_benchmarks.py --batch_size 64 --model <name_of_the_network> --engine MIOPEN
Running example scripts
Please refer to the example scripts in caffe2/python/examples. It currently has resnet50_trainer.py which can run ResNet’s, ResNeXt’s with various layer, groups, depth configurations and char_rnn.py which uses RNNs to do character level prediction.
Building own docker images
After cloning the pytorch repository, you can build your own Caffe2 ROCm docker image. Navigate to pytorch repo and run
cd docker/caffe2/jenkins
./build.sh py2-clang7-rocmdeb-ubuntu16.04
This should complete with a message “Successfully built <image_id>” which can then be used to install Caffe2 as in Option 2 above.
MIVisionX
MIVisionX toolkit is a set of comprehensive computer vision and machine intelligence libraries, utilities, and applications bundled into a single toolkit. AMD MIVisionX delivers highly optimized open source implementation of the Khronos OpenVX™ and OpenVX™ Extensions along with Convolution Neural Net Model Compiler & Optimizer supporting ONNX, and Khronos NNEF™ exchange formats. The toolkit allows for rapid prototyping and deployment of optimized workloads on a wide range of computer hardware, including small embedded x86 CPUs, APUs, discrete GPUs, and heterogeneous servers.

AMD OpenVX [amd_openvx] is a highly optimized open source implementation of the Khronos OpenVX computer vision specification. It allows for rapid prototyping as well as fast execution on a wide range of computer hardware, including small embedded x86 CPUs and large workstation discrete GPUs.
The OpenVX framework provides a mechanism to add new vision functions to OpenVX by 3rd party vendors. This project has below mentioned OpenVX modules and utilities to extend amd_openvx project, which contains the AMD OpenVX Core Engine.
amd_loomsl: AMD Radeon Loom stitching library for live 360 degree video applications.

amd_nn: OpenVX neural network module

amd_opencv: OpenVX module that implements a mechanism to access OpenCV functionality as OpenVX kernels
amd_winml: WinML extension will allow developers to import a pre-trained ONNX model into an OpenVX graph and add hundreds of different pre & post processing vision/generic/user-defined functions, available in OpenVX and OpenCV interop, to the input and output of the neural net model. This will allow developers to build an end to end application for inference.

MIVisionX has a number of applications built on top of OpenVX modules, it uses AMD optimized libraries to build applications which can be used to prototype or used as models to develop a product.
Cloud Inference Application: This sample application does inference using a client-server system.
Digit Test This sample application is used to recognize hand written digits.
MIVisionX OpenVX Classsification: This sample application shows how to run supported pre-trained caffe models with MIVisionX RunTime.
MIVisionX WinML Classification: This sample application shows how to run supported ONNX models with MIVisionX RunTime on Windows.
MIVisionX WinML YoloV2: This sample application shows how to run tiny yolov2(20 classes) with MIVisionX RunTime on Windows.

Neural Net Model Compiler & Optimizer model_compiler converts pre-trained neural net models to MIVisionX runtime code for optimized inference.
The Radeon Augmentation Library RALI is designed to efficiently decode and process images and videos from a variety of storage formats and modify them through a processing graph programmable by the user.
MIVisionX samples using OpenVX and OpenVX extension libraries
GDF - Graph Description Format
MIVisionX samples using runvx with GDF
skintonedetect.gdf
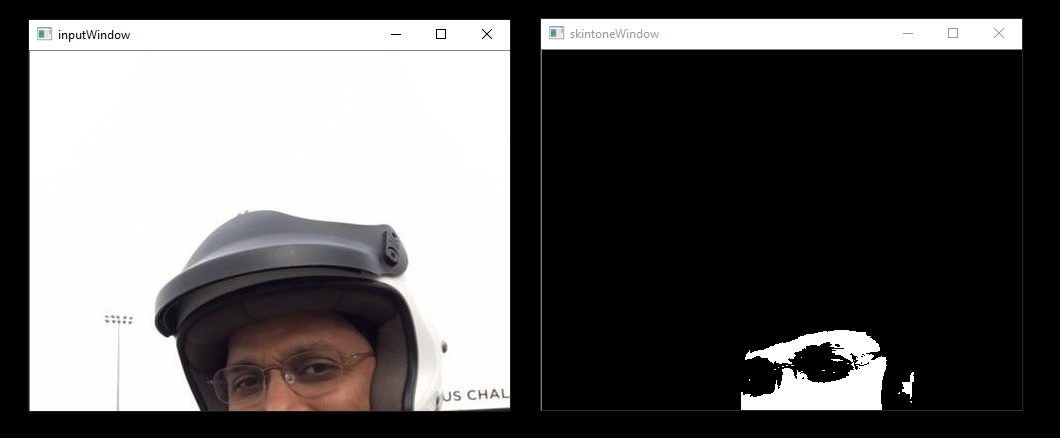
usage:
runvx skintonedetect.gdf
canny.gdf
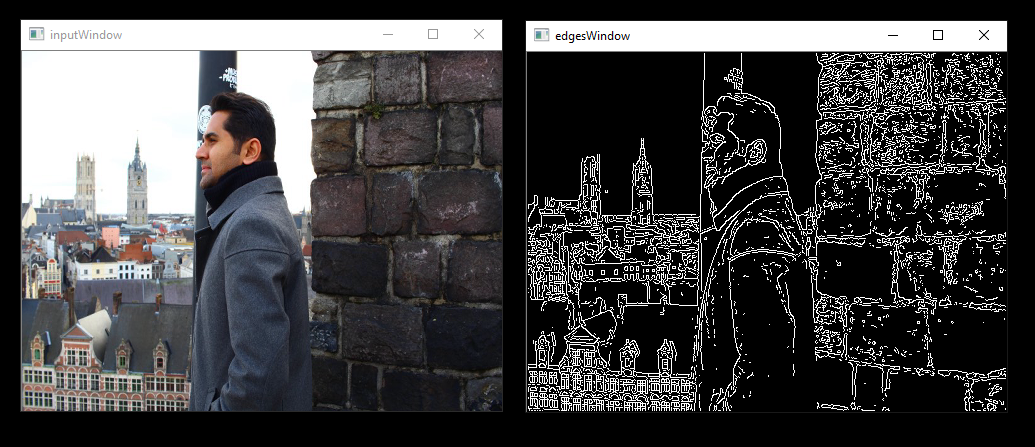
usage:
runvx canny.gdf
skintonedetect-LIVE.gdf
Using live camera
usage:
runvx -frames:live skintonedetect-LIVE.gdf
canny-LIVE.gdf
Using live camera
usage:
runvx -frames:live canny-LIVE.gdf
OpenCV_orb-LIVE.gdf
Using live camera
usage:
runvx -frames:live OpenCV_orb-LIVE.gdf
Note: More samples available on GitHub
MIVisionX Toolkit, is a comprehensive set of help tools for neural net creation, development, training, and deployment. The Toolkit provides you with helpful tools to design, develop, quantize, prune, retrain, and infer your neural network work in any framework. The Toolkit is designed to help you deploy your work to any AMD or 3rd party hardware, from embedded to servers.
MIVisionX provides you with tools for accomplishing your tasks throughout the whole neural net life-cycle, from creating a model to deploying them for your target platforms.
inference_generator: generate inference library from pre-trained CAFFE models
loom_shell: an interpreter to prototype 360 degree video stitching applications using a script
RunVX: command-line utility to execute OpenVX graph described in GDF text file
RunCL: command-line utility to build, execute, and debug OpenCL programs
CPU: SSE4.1 or above CPU, 64-bit
GPU: GFX7 or above [optional]
APU: Carrizo or above [optional]
Note: Some modules in MIVisionX can be built for CPU only. To take advantage of advanced features and modules we recommend using AMD GPUs or AMD APUs.
Windows
Windows 10
Windows SDK
Visual Studio 2017
Install the latest drivers and OpenCL SDK <https://github.com/GPUOpen-LibrariesAndSDKs/OCL-SDK/releases/tag/1.0>_
- OpenCV
Set OpenCV_DIR environment variable to OpenCV/build folder
Add %OpenCV_DIR%x64vc14bin or %OpenCV_DIR%x64vc15bin to your PATH
Linux
Install ROCm
ROCm CMake, MIOpenGEMM & MIOpen for Neural Net Extensions (vx_nn)
CMake 2.8 or newer download
Qt Creator for Cloud Inference Client
- Protobuf for inference generator & model compiler
install libprotobuf-dev and protobuf-compiler needed for vx_nn
- ` OpenCV <https://github.com/opencv/opencv/releases/tag/3.4.0>`_
Set OpenCV_DIR environment variable to OpenCV/build folder
- FFMPEG - Optional
FFMPEG is required for amd_media & mv_deploy modules
For the convenience of the developer, we here provide the setup script which will install all the dependencies required by this project.
MIVisionX-setup.py- This scipts builds all the prerequisites required by MIVisionX. The setup script creates a deps folder and installs all the prerequisites, this script only needs to be executed once. If -d option for directory is not given the script will install deps folder in ‘~/’ directory by default, else in the user specified folder.
Prerequisites for running the scripts
ubuntu 16.04/18.04 or CentOS 7.5/7.6
usage:
python MIVisionX-setup.py --directory [setup directory - optional]
                          --installer [Package management tool - optional (default:apt-get) [options: Ubuntu:apt-get;CentOS:yum]]
                          --miopen    [MIOpen Version - optional (default:2.1.0)]
                          --miopengemm[MIOpenGEMM Version - optional (default:1.1.5)]
                          --ffmpeg    [FFMPEG Installation - optional (default:no) [options:Install ffmpeg - yes]]
                          --rpp       [RPP Installation - optional (default:yes) [options:yes/no]]
Note: use –installer yum for CentOS
Windows
Using .msi packages
MIVisionX-installer.msi: MIVisionX
MIVisionX_WinML-installer.msi: MIVisionX for WinML
Using Visual Studio 2017 on 64-bit Windows 10
Install OpenCL_SDK
Use MIVisionX.sln to build for x64 platform
NOTE: vx_nn is not supported on Windows in this release
Linux
Using apt-get/yum
Prerequisites
Ubuntu 16.04/18.04 or CentOS 7.5/7.6
Ubuntu
sudo apt-get install mivisionx
CentOS
sudo yum install mivisionx
Note:
vx_winml is not supported on linux
source code will not available with apt-get/yum install
executables placed in /opt/rocm/mivisionx/bin and libraries in /opt/rocm/mivisionx/lib
OpenVX and module header files into /opt/rocm/mivisionx/include
model compiler, toolkit, & samples placed in /opt/rocm/mivisionx
Package (.deb & .rpm) install requires OpenCV v3.4.0 to execute AMD OpenCV extensions
Using MIVisionX-setup.py and CMake on Linux (Ubuntu 16.04/18.04 or CentOS 7.5/7.6) with ROCm
Install ROCm
Use the below commands to setup and build MIVisionX
git clone https://github.com/GPUOpen-ProfessionalCompute-Libraries/MIVisionX.git
cd MIVisionX
python MIVisionX-setup.py --directory [setup directory - optional]
                          --installer [Package management tool - optional (default:apt-get) [options: Ubuntu:apt-get;CentOS:yum]]
                          --miopen    [MIOpen Version - optional (default:2.1.0)]
                          --miopengemm[MIOpenGEMM Version - optional (default:1.1.5)]
                          --ffmpeg    [FFMPEG Installation - optional (default:no) [options:Install ffmpeg - yes]]
                          --rpp       [RPP Installation - optional (default:yes) [options:yes/no]]
Note: Use –installer yum for CentOS
mkdir build
cd build
cmake ../
make -j8
sudo make install
Note:
vx_winml is not supported on Linux
the installer will copy all executables into /opt/rocm/mivisionx/bin and libraries into /opt/rocm/mivisionx/lib
the installer also copies all the OpenVX and module header files into /opt/rocm/mivisionx/include folder
Using CMake on Linux (Ubuntu 16.04 64-bit or CentOS 7.5 / 7.6 ) with ROCm
Install ROCm
- git clone, build and install other ROCm projects (using cmake and % make install) in the below order for vx_nn.
MIOpen – make sure to use -DMIOPEN_BACKEND=OpenCL option with cmake
install protobuf
install OpenCV
install FFMPEG n4.0.4 - Optional
- build and install (using cmake and % make install)
executables will be placed in bin folder
libraries will be placed in lib folder
the installer will copy all executables into /opt/rocm/mivisionx/bin and libraries into /opt/rocm/lib
the installer also copies all the OpenVX and module header files into /opt/rocm/mivisionx/include folder
add the installed library path to LD_LIBRARY_PATH environment variable (default /opt/rocm/mivisionx/lib)
add the installed executable path to PATH environment variable (default /opt/rocm/mivisionx/bin)
Linux
The installer will copy all executables into /opt/rocm/mivisionx/bin and libraries into /opt/rocm/mivisionx/lib
The installer also copies all the OpenVX and OpenVX module header files into /opt/rocm/mivisionx/include folder
Apps, Samples, Documents, Model Compiler and Toolkit are placed into /opt/rocm/mivisionx
Run samples to verify the installation
Canny Edge Detection
export PATH=$PATH:/opt/rocm/mivisionx/bin
export LD_LIBRARY_PATH=$LD_LIBRARY_PATH:/opt/rocm/mivisionx/lib
runvx /opt/rocm/mivisionx/samples/gdf/canny.gdf
Note: More samples are available here
MIVisionX provides developers with docker images for Ubuntu 16.04, Ubuntu 18.04, CentOS 7.5, & CentOS 7.6. Using docker images developers can quickly prototype and build applications without having to be locked into a single system setup or lose valuable time figuring out the dependencies of the underlying software.
MIVisionX Docker
Docker Workflow Sample on Ubuntu 16.04/18.04
Prerequisites
Ubuntu 16.04/18.04
Workflow
Step 1 - Install rocm-dkms
sudo apt update
sudo apt dist-upgrade
sudo apt install libnuma-dev
sudo reboot
wget -qO - https://repo.radeon.com/rocm/apt/debian/rocm.gpg.key | sudo apt-key add -
echo 'deb [arch=amd64] https://repo.radeon.com/rocm/apt/debian/ xenial main' | sudo tee /etc/apt/sources.list.d/rocm.list
sudo apt update
sudo apt install rocm-dkms
sudo reboot
Step 2 - Setup Docker
sudo apt-get install curl
sudo curl -fsSL https://download.docker.com/linux/ubuntu/gpg | sudo apt-key add -
sudo add-apt-repository "deb [arch=amd64] https://download.docker.com/linux/ubuntu $(lsb_release -cs) stable"
sudo apt-get update
apt-cache policy docker-ce
sudo apt-get install -y docker-ce
sudo systemctl status docker
Step 3 - Get Docker Image
sudo docker pull mivisionx/ubuntu-16.04
Step 4 - Run the docker image
sudo docker run -it --device=/dev/kfd --device=/dev/dri --cap-add=SYS_RAWIO --device=/dev/mem --group-add video --network host mivisionx/ ubuntu-16.04
- Optional: Map localhost directory on the docker image
option to map the localhost directory with trained caffe models to be accessed on the docker image.
usage: -v {LOCAL_HOST_DIRECTORY_PATH}:{DOCKER_DIRECTORY_PATH}
sudo docker run -it -v /home/:/root/hostDrive/ --device=/dev/kfd --device=/dev/dri --cap-add=SYS_RAWIO --device=/dev/mem --group-add video --network host mivisionx/ubuntu-16.04
Note: Display option with docker
Using host display
xhost +local:root
sudo docker run -it --device=/dev/kfd --device=/dev/dri --cap-add=SYS_RAWIO --device=/dev/mem --group-add video
--network host --env DISPLAY=unix$DISPLAY --privileged --volume $XAUTH:/root/.Xauthority
--volume /tmp/.X11-unix/:/tmp/.X11-unix mivisionx/ubuntu-16.04:latest
Test display with MIVisionX sample
export PATH=$PATH:/opt/rocm/mivisionx/bin
export LD_LIBRARY_PATH=$LD_LIBRARY_PATH:/opt/rocm/mivisionx/lib
runvx /opt/rocm/mivisionx/samples/gdf/canny.gdf
Known issues
Package (.deb & .rpm) install requires OpenCV v3.4.0 to execute AMD OpenCV extensions
Tested configurations
Windows 10
Linux: Ubuntu - 16.04/18.04 & CentOS - 7.5/7.6
ROCm: rocm-dkms - 2.9.6
rocm-cmake - github master:ac45c6e
MIOpenGEMM - 1.1.5
MIOpen - 2.1.0
Protobuf - V3.5.2
OpenCV - 3.4.0
Dependencies for all the above packages