
ROCm Installation v4.3
Deploying ROCm
AMD hosts both Debian and RPM repositories for the ROCm v4.x packages.
The following directions show how to install ROCm on supported Debian-based systems such as Ubuntu 18.04.x
Note: These directions may not work as written on unsupported Debian-based distributions. For example, newer versions of Ubuntu may not be compatible with the rock-dkms kernel driver. In this case, you can exclude the rocm-dkms and rock-dkms packages.
Note: You must use either ROCm or the amdgpu-pro driver. Using both drivers will result in an installation error.
Important - Mellanox ConnectX NIC Users: If you are using Mellanox ConnectX NIC, you must install Mellanox OFED before installing ROCm.
For more information about installing Mellanox OFED, refer to:
https://docs.mellanox.com/display/MLNXOFEDv461000/Installing+Mellanox+OFED
ROCm Repositories
Use the following ROCm repositories for the required major and point releases:
Major releases - https://repo.radeon.com/rocm/yum/rpm/
Point releases - https://repo.radeon.com/rocm/yum/4.3/
Base Operating System Kernel Upgrade
For SUSE, it is strongly recommended to follow the steps below when upgrading the base operating system kernel:
Remove rock-dkms before the upgrade.
Install the new kernel.
Reboot the system.
Reinstall rock-dkms.
Implementing these steps ensures correct loading of amdgpu and amdkfd after the kernel upgrade and prevents any issue caused by an incomplete DKMS upgrade. Fedora and Ubuntu do not have this restriction.
Prerequisites
The AMD ROCm platform is designed to support the following operating systems:
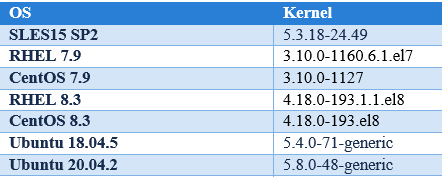
Note: Ubuntu versions lower than 18 are no longer supported.
Note: AMD ROCm only supports Long Term Support (LTS) versions of Ubuntu. Versions other than LTS may work with ROCm, however, they are not officially supported.
Perl Modules for HIP-Base Package
The hip-base package has a dependency on Perl modules that some operating systems may not have in their default package repositories. Use the following commands to add repositories that have the required Perl packages:
For SLES 15 SP2
sudo zypper addrepo
For more information, see
https://download.opensuse.org/repositories/devel:languages:perl/SLE_15/devel:languages:perl.repo
For CentOS8.3
sudo yum config-manager --set-enabled powertools
For RHEL8.3
sudo subscription-manager repos --enable codeready-builder-for-rhel-8-x86_64-rpms
Complete Reinstallation OF AMD ROCm V4.3 Recommended
Complete uninstallation of previous ROCm versions is required before installing a new version of ROCm. An upgrade from previous releases to AMD ROCm v4.3 is not supported.
Note: AMD ROCm release v3.3 or prior releases are not fully compatible with AMD ROCm v3.5 and higher versions. You must perform a fresh ROCm installation if you want to upgrade from AMD ROCm v3.3 or older to 3.5 or higher versions and vice-versa.
For ROCm v3.5 and releases thereafter, the clinfo path is changed to - /opt/rocm/opencl/bin/clinfo.
For ROCm v3.3 and older releases, the clinfo path remains unchanged - /opt/rocm/opencl/bin/x86_64/clinfo.
Note: After an operating system upgrade, AMD ROCm may upgrade automatically and result in an error. This is because AMD ROCm does not support upgrades currently. You must uninstall and reinstall AMD ROCm after an operating system upgrade.
Multi-version Installation Updates
With the AMD ROCm v4.3 release, the following ROCm multi-version installation changes apply:
The meta packages rocm-dkms<version> are now deprecated for multi-version ROCm installs. For example, rocm-dkms3.7.0, rocm-dkms3.8.0.
Multi-version installation of ROCm should be performed by installing rocm-dev<version> using each of the desired ROCm versions. For example, rocm-dev3.7.0, rocm-dev3.8.0, rocm-dev3.9.0.
‘version’ files should be created for each multi-version rocm <= 4.3.0
command: echo <version> | sudo tee /opt/rocm-<version>/.info/version
example: echo 4.3.0 | sudo tee /opt/rocm-4.3.0/.info/version
The rock-dkms loadable kernel modules should be installed using a single rock-dkms package.
ROCm v3.9 and above will not set any ldconfig entries for ROCm libraries for multi-version installation. Users must set LD_LIBRARY_PATH to load the ROCm library version of choice.
NOTE: The single version installation of the ROCm stack remains the same. The rocm-dkms package can be used for single version installs and is not deprecated at this time.
Note: Before updating to the latest version of the operating system, delete the ROCm packages to avoid DKMS-related issues.
Setting Permissions for Groups
This section provides steps to add any current user to a video group to access GPU resources.
Issue the following command to check the groups in your system:
groups
Add yourself to the video group using the following instruction:
sudo usermod -a -G video $LOGNAME
For all ROCm supported operating systems, continue to use video group. By default, you can add any future users to the video and render groups.
Note: render group is required only for Ubuntu v20.04.
To add future users to the video and render groups, run the following command:
echo 'ADD_EXTRA_GROUPS=1' | sudo tee -a /etc/adduser.conf

echo 'EXTRA_GROUPS=video' | sudo tee -a /etc/adduser.conf

echo 'EXTRA_GROUPS=render' | sudo tee -a /etc/adduser.conf
Supported Operating Systems
Ubuntu
Note: AMD ROCm only supports Long Term Support (LTS) versions of Ubuntu. Versions other than LTS may work with ROCm, however, they are not officially supported.
Installing a ROCm Package from a Debian Repository
To install from a Debian Repository:
Run the following code to ensure that your system is up to date:
sudo apt update

sudo apt dist-upgrade

sudo apt install libnuma-dev

sudo reboot
Add the ROCm apt repository.
For Debian-based systems like Ubuntu, configure the Debian ROCm repository as follows:
Key: https://repo.radeon.com/rocm/rocm.gpg.key
sudo apt install wget gnupg2

wget -q -O - https://repo.radeon.com/rocm/rocm.gpg.key | sudo apt-key add -

echo 'deb [arch=amd64] https://repo.radeon.com/rocm/apt/<ROCm_version#>/ ubuntu main' | sudo tee /etc/apt/sources.list.d/rocm.list
For example
For the current version of ROCm, ensure you replace <ROCm_version#> with debian.
echo 'deb [arch=amd64] https://repo.radeon.com/rocm/apt/debian/ ubuntu main' | sudo tee /etc/apt/sources.list.d/rocm.list
For older versions of ROCm, replace <ROCm_version#> with any ROCm versions number like 4.3.1, 4.3 or 4.2.
For example,
echo 'deb [arch=amd64] https://repo.radeon.com/rocm/apt/4.3/ ubuntu main' | sudo tee /etc/apt/sources.list.d/rocm.list
Note: For ROCm v4.1 and lower, use ‘xenial main’, instead of ‘ubuntu main’, as shown below.
wget -q -O - https://repo.radeon.com/rocm/rocm.gpg.key | sudo apt-key add -
echo 'deb [arch=amd64] https://repo.radeon.com/rocm/apt/<ROCm_version#>/ xenial main' | sudo tee /etc/apt/sources.list.d/rocm.list
For example,
echo 'deb [arch=amd64] https://repo.radeon.com/rocm/apt/4.1/ ubuntu main' | sudo tee /etc/apt/sources.list.d/rocm.list
Note: For developer systems or Docker containers (where it could be beneficial to use a fixed ROCm version), select a versioned repository from:
https://repo.radeon.com/rocm/apt/
The gpg key may change; ensure it is updated when installing a new release. If the key signature verification fails while updating, re-add the key from the ROCm apt repository.
wget -q -O - https://repo.radeon.com/rocm/rocm.gpg.key | sudo apt-key add -
The current rocm.gpg.key is not available in a standard key ring distribution, but has the following sha1sum hash:
777947b2579611bf4d377687b5013c69642c5762 rocm.gpg.key
Install the ROCm meta-package. Update the appropriate repository list and install the rocm-dkms meta-package:
sudo apt update

sudo apt install rocm-dkms && sudo reboot
Restart the system.
After restarting the system, run the following commands to verify that the ROCm installation is successful. If you see your GPUs listed by both commands, the installation is considered successful.
/opt/rocm/bin/rocminfo
/opt/rocm/opencl/bin/clinfo
Note: To run the ROCm programs, add the ROCm binaries in your PATH.
echo 'export PATH=$PATH:/opt/rocm/bin:/opt/rocm/rocprofiler/bin:/opt/rocm/opencl/bin' | sudo tee -a /etc/profile.d/rocm.sh
Uninstalling ROCm Packages from Ubuntu
To uninstall the ROCm packages from Ubuntu 20.04 or Ubuntu 18.04.5, run the following command:
sudo apt autoremove rocm-opencl rocm-dkms rocm-dev rocm-utils && sudo reboot
Using Debian-based ROCm with Upstream Kernel Drivers
You can install ROCm user-level software without installing AMD’s custom ROCk kernel driver. The kernel used must have the HSA kernel driver option enabled and compiled into the amdgpu kernel driver. To install only ROCm user-level software, run the following commands instead of installing rocm-dkms:
sudo apt update
sudo apt install rocm-dev
echo 'SUBSYSTEM=="kfd", KERNEL=="kfd", TAG+="uaccess", GROUP="video"' | sudo tee /etc/udev/rules.d/70-kfd.rules
CentOS RHEL
This section describes how to install ROCm on supported RPM-based systems such as CentOS/RHEL.
Preparing RHEL for Installation
RHEL is a subscription-based operating system. You must enable the external repositories to install on the devtoolset-7 environment and the dkms support files.
Note: The following steps do not apply to the CentOS installation.
The subscription for RHEL must be enabled and attached to a pool ID. See the Obtaining an RHEL image and license page for instructions on registering your system with the RHEL subscription server and attaching to a pool id.
Enable the following repositories for RHEL v7.x:
sudo subscription-manager repos --enable rhel-server-rhscl-7-rpms
sudo subscription-manager repos --enable rhel-7-server-optional-rpms
sudo subscription-manager repos --enable rhel-7-server-extras-rpms
Enable additional repositories by downloading and installing the epel-release-latest-7/epel-release-latest-8 repository RPM:
sudo rpm -ivh <repo>
For more details,
see https://dl.fedoraproject.org/pub/epel/epel-release-latest-7.noarch.rpm for RHEL v7.x
see https://dl.fedoraproject.org/pub/epel/epel-release-latest-8.noarch.rpm for RHEL v8.x
Install and set up Devtoolset-7.
Note: Devtoolset is not required for CentOS/RHEL v8.x
To setup the Devtoolset-7 environment, follow the instructions on this page: https://www.softwarecollections.org/en/scls/rhscl/devtoolset-7/
Note: devtoolset-7 is a software collections package and is not supported by AMD.
Add the ROCm GPG key
sudo rpm --import https://repo.radeon.com/rocm/rocm.gpg.key
Installing CentOS for DKMS
Use the dkms tool to install the kernel drivers on CentOS/RHEL:
sudo yum install -y epel-release
sudo yum install -y dkms kernel-headers-`uname -r` kernel-devel-`uname -r`
Installing ROCm
To install ROCm on your system, follow the instructions below:
Delete the previous versions of ROCm before installing the latest version.
Create a /etc/yum.repos.d/rocm.repo file with the following contents:
CentOS/RHEL 7.x : https://repo.radeon.com/rocm/yum/rpm
CentOS/RHEL 8.x : https://repo.radeon.com/rocm/centos8/rpm
[ROCm]
name=ROCm
baseurl=https://repo.radeon.com/rocm/yum/rpm
enabled=1
gpgcheck=1
gpgkey=https://repo.radeon.com/rocm/rocm.gpg.key
Note: The URL of the repository must point to the location of the repositories’ repodata database. For developer systems or Docker containers (where it could be beneficial to use a fixed ROCm version), select a versioned repository from:
https://repo.radeon.com/rocm/yum/
Install ROCm components using the following command:
sudo yum install rocm-dkms && sudo reboot
Restart the system. The rock-dkms component is installed and the /dev/kfd device is now available.
Restart the system.
Test the ROCm installation.
Testing the ROCm Installation
After restarting the system, run the following commands to verify that the ROCm installation is successful. If you see your GPUs listed, you are good to go!
/opt/rocm/bin/rocminfo
/opt/rocm/opencl/bin/clinfo
Note: Add the ROCm binaries in your PATH for easy implementation of the ROCm programs.
echo 'export PATH=$PATH:/opt/rocm/bin:/opt/rocm/profiler/bin:/opt/rocm/opencl/bin' | sudo tee -a /etc/profile.d/rocm.sh
Compiling Applications Using HCC, HIP, and Other ROCm Software
To compile applications or samples, run the following command to use gcc-7.2 provided by the devtoolset-7 environment:
scl enable devtoolset-7 bash
Uninstalling ROCm from CentOS/RHEL
To uninstall the ROCm packages, run the following command:
sudo yum autoremove rocm-opencl rocm-dkms rock-dkms
Using ROCm on CentOS/RHEL with Upstream Kernel Drivers
You can install ROCm user-level software without installing AMD’s custom ROCk kernel driver. The kernel used must have the HSA kernel driver option enabled and compiled into the amdgpu kernel driver. To install only ROCm user-level software, run the following commands instead of installing rocm-dkms:
sudo yum install rocm-dev
echo 'SUBSYSTEM=="kfd", KERNEL=="kfd", TAG+="uaccess", GROUP="video"' | sudo tee /etc/udev/rules.d/70-kfd.rules
sudo reboot
Note: Ensure you restart the system after ROCm installation.
Installing Development Packages for Cross Compilation
You can develop and test ROCm packages on different systems. For example, some development or build systems may not have an AMD GPU installed. In this scenario, you can avoid installing the ROCm kernel driver on your development system. Instead, install the following development subset of packages:
sudo yum install rocm-dev
Note: To execute ROCm-enabled applications, you will require a system installed with the full ROCm driver stack.
SLES 15 Service Pack 2
The following section tells you how to perform an install and uninstall ROCm on SLES 15 SP 2.
Note: For SUSE-based distributions (SLE, OpenSUSE, etc), upgrading the base kernel after installing ROCm may result in a broken installation. This is due to policies regarding unsupported kernel modules. To mitigate this, make the following change before initializing the amdgpu module:
#Allow Unsupported Driver and Load Driver
cat <<EOF | tee /etc/modprobe.d/10-unsupported-modules.conf
allow_unsupported_modules 1
EOF
For more information, refer to https://www.suse.com/support/kb/doc/?id=000016939
Installation
Install the “dkms” package.
sudo SUSEConnect --product PackageHub/15.2/x86_64
sudo zypper install dkms
Add the ROCm repo.
sudo zypper clean –all
sudo zypper addrepo https://download.opensuse.org/repositories/devel:languages:perl/SLE_15/devel:languages:perl.repo
sudo zypper ref
sudo rpm --import https://repo.radeon.com/rocm/rocm.gpg.key
sudo zypper --gpg-auto-import-keys install rocm-dkms
sudo reboot
Note: For developer systems or Docker containers (where it could be beneficial to use a fixed ROCm version), select a versioned repository from:
https://repo.radeon.com/rocm/zyp/
Run the following command once
cat <<EOF | sudo tee /etc/modprobe.d/10-unsupported-modules.conf
allow_unsupported_modules 1
EOF
sudo modprobe amdgpu
Verify the ROCm installation.
Run /opt/rocm/bin/rocminfo and /opt/rocm/opencl/bin/clinfo commands to list the GPUs and verify that the ROCm installation is successful.
Restart the system.
Test the basic ROCm installation.
After restarting the system, run the following commands to verify that the ROCm installation is successful. If you see your GPUs listed by both commands, the installation is considered successful.
/opt/rocm/bin/rocminfo
/opt/rocm/opencl/bin/clinfo
Note: To run the ROCm programs more efficiently, add the ROCm binaries in your PATH.
echo ‘export PATH=$PATH:/opt/rocm/bin:/opt/rocm/profiler/bin:/opt/rocm/opencl/bin’|sudo tee -a /etc/profile.d/rocm.sh
Using ROCm on SLES with Upstream Kernel Drivers
sudo zypper install rocm-dev
echo 'SUBSYSTEM=="kfd", KERNEL=="kfd", TAG+="uaccess", GROUP="video"' | sudo tee /etc/udev/rules.d/70-kfd.rules
sudo reboot
Uninstallation
To uninstall, use the following command:
sudo zypper remove rocm-opencl rocm-dkms rock-dkms
Note: Ensure all other installed packages/components are removed. Note: Ensure all the content in the /opt/rocm directory is completely removed. If the command does not remove all the ROCm components/packages, ensure you remove them individually.
Performing an OpenCL-only Installation of ROCm
Some users may want to install a subset of the full ROCm installation. If you are trying to install on a system with a limited amount of storage space, or which will only run a small collection of known applications, you may want to install only the packages that are required to run OpenCL applications. To do that, you can run the following installation command instead of the command to install rocm-dkms.
sudo yum install rock-dkms rocm-opencl-devel && sudo reboot
ROCm Installation Known Issues and Workarounds
The ROCm platform relies on some closed source components to provide functionalities like HSA image support. These components are only available through the ROCm repositories, and they may be deprecated or become open source components in the future. These components are made available in the following packages:
hsa-ext-rocr-dev
Getting the ROCm Source Code
AMD ROCm is built from open source software. It is, therefore, possible to modify the various components of ROCm by downloading the source code and rebuilding the components. The source code for ROCm components can be cloned from each of the GitHub repositories using git. For easy access to download the correct versions of each of these tools, the ROCm repository contains a repo manifest file called default.xml. You can use this manifest file to download the source code for ROCm software.
The repo tool from Google® allows you to manage multiple git repositories simultaneously. Run the following commands to install the repo:
mkdir -p ~/bin/
curl https://storage.googleapis.com/git-repo-downloads/repo > ~/bin/repo
chmod a+x ~/bin/repo
Note: You can choose a different folder to install the repo into if you desire. ~/bin/ is used as an example.
Downloading the ROCm Source Code
The following example shows how to use the repo binary to download the ROCm source code. If you choose a directory other than ~/bin/ to install the repo, you must use that chosen directory in the code as shown below:
mkdir -p ~/ROCm/
cd ~/ROCm/
~/bin/repo init -u https://github.com/RadeonOpenCompute/ROCm.git -b roc-4.3.x
repo sync
Note: Using this sample code will cause the repo to download the open source code associated with this ROCm release. Ensure that you have ssh-keys configured on your machine for your GitHub ID prior to the download.